Whether you’re a seasoned seamstress, a fledgling fashionista, or a die-hard DIY hobbyist, creating your own tote bag with a flat bottom can be a truly rewarding and satisfying craft project. There’s something undeniably magical about transforming ordinary, flat material into something stylish, functional, and unique that you can use or gift to someone special.
Tote bags, with their roomy interior and unstructured silhouette, are extremely handy for a variety of uses. From carrying groceries to doubling as a stylish work bag, these versatile accessories offer an incredible blend of practicality and style. But add a flat bottom into the mix, and you suddenly elevate your tote bag to a whole new level of usability. Not only does a flat bottom make your tote bag more spacious, but it also lends it an added sturdiness, allowing it to stand upright when set down.
Making your own tote bag also unlocks endless opportunities for personal expression. You can flaunt your unique style through the fabrics and colors you choose, and even add personalized features like pockets, tags, or custom stitching.
But above all, there’s nothing quite like the joy and sheer delight that comes from crafting something with your own hands. Knowing that every stitch, every seam, and every lining was carefully placed by you infuses the bag with a personal touch that no mass-produced accessory can match. So, if you’re ready to embrace the beautiful blend of creativity and craftsmanship that this project offers, keep reading. We’ll navigate through the exciting journey of designing your own tote bag with a flat bottom, step by step!
Materials Needed
Your sewing adventure starts with gathering the right materials. These are the building blocks that will form your bespoke tote bag, so choose wisely. For this project, you’ll need:
- Fabric: Opt for sturdy material like canvas, denim, or thick cotton. Consider the style you’re going for – a playful print, a bold solid color, or a rustic jute fabric can dramatically alter your tote’s final look.
- A Ruler or measuring tape: Precision is key in a project like this, so a reliable measuring tool is essential.
- Fabric Scissors: A pair of sharp fabric scissors will ensure clean cut lines for a professional finish.
- Fabric Chalk or pens: To avoid any errors during the cutting process, you’ll need a fabric marker to outline your patterns.
- Pins: To keep the fabric pieces in place while sewing, you’ll need a good array of pins.
- Sewing Machine (optional): While you can hand sew this tote, a sewing machine will save time and give a more uniform stitch.
Steps to Sewing Your Tote Bag
Step 1: Cutting Your Fabric
Before sewing comes the cutting – the foundation of your bag’s structure. Start by deciding the dimensions of your tote bag. A standard size might be 15 inches wide by 16 inches tall, but you can adjust according to your needs. For the flat bottom, you may want to add an extra 2 – 3 inches on both the width and height for seam allowances and the bottom fold.
Once you’ve made your calculations, it’s time to lay your fabric flat, measure twice using your ruler or measuring tape, and use your fabric chalk to mark your cut lines. Remember, straight edges make for cleaner seams, so don’t rush this step.
Step 2: Pinning and Sewing the Edges
Lay out the two pieces of fabric that will form the main body of your bag, with the inside (wrong) sides facing out. Pin the fabric along the sides and bottom edge, leaving the top edge open for now. If you’re adding a lining, pin it to the outer fabric along these same lines.
Make sure your sewing machine is threaded, or if hand sewing, that your needle and thread are ready. Sew a straight stitch along the pinned lines, usually a half-inch from the edge. Go slowly to ensure the fabric doesn’t pucker and the stitches remain even.
Step 3: Constructing the Flat Bottom
Turn your tote bag inside-out so that the right sides are facing each other. To create a flat bottom for your bag, you need to form a separate seam along each bottom corner of the tote.
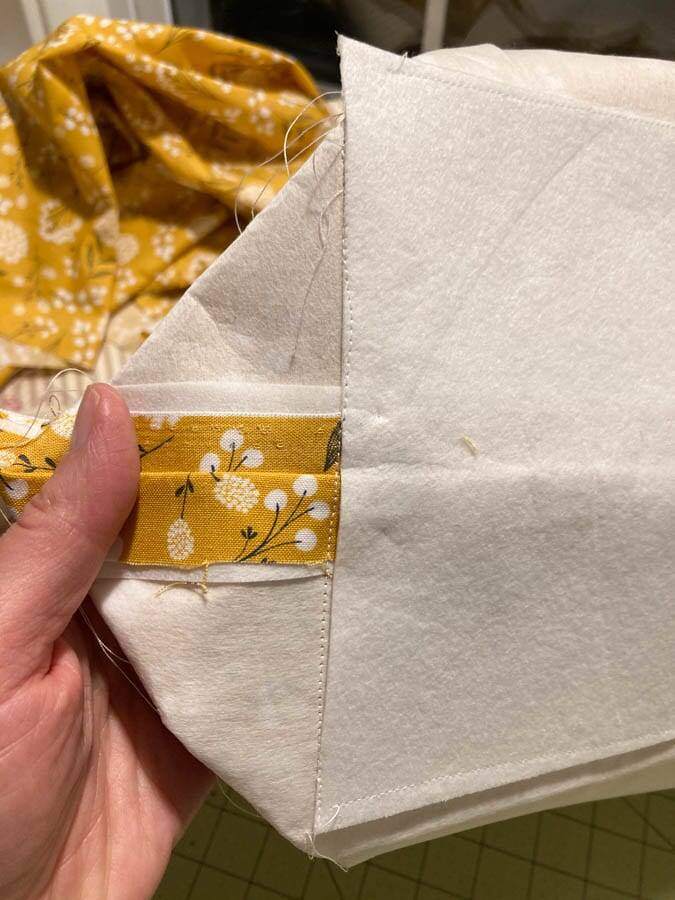
Flatten one of the bottom corners of the bag, aligning the side seam with the bottom seam to create a triangle. Measure and mark a line perpendicular to the side seam about 2-3 inches from the point of the triangle depending on how wide you want the base to be. Sew across this line, then cut off the extra triangle about a quarter inch from your seam. Repeat on the other corner.
Step 4: Adding Handles and Finishing Touches
Handles are next. Cut out two lengths of fabric for your straps to your desired length, considering the width of the bag and personal preference for how you’d like it to hang.
Fold the edges inwards and iron them to hold them in place before sewing down the length of the strap, ensuring you catching all edges for a clean finish. Attach the straps to the bag by sewing them to the outside, ensuring they are evenly spaced and secure.
Lastly, hem the top edge of the tote for a neat finish by folding the raw edge inward twice, ironing it flat, and sewing a topstitch around the entire opening.
Lining Addition (Optional but recommended)
Adding a lining can extend the life of your tote, as well as add a hidden splash of color or pattern. To add one, cut a fabric piece that’s the same size as your bag. Remember to include the seam allowance and constructs the lining in the same way as the outer bag. Insert the lining into the tote bag, wrong sides together, and sew the lining in place either by sewing it into the top hem or by machine-stitching it just below the hem for a cleaner look.
Customization Tips
Once you’re comfortable with the basic tote bag, it’s time to unleash your creativity.
- Add pockets by sewing additional pieces of fabric to the inside or outside before assembling the bag.
- Incorporate a closure such as a magnetic button, zipper, or Velcro.
- Sew on decorative elements like buttons, appliqué patches, or embroidery to reflect your personal style.
- Play around with color-blocking by making each side of the bag a different color, or the bottom an accent color.
Maintenance and Care for Your Tote Bag
To keep your bag in mint condition, gentle hand-washing is the safest bet. If machine washing, opt for a gentle cycle and cold water to prevent shrinking or stretching, especially if you’re using a cotton fabric. Avoid the dryer if possible, instead let your bag air dry.
Common Mistakes and How to Avoid Them
- Not prewashing the fabric: Fabric can shrink after washing. Prewashing your fabric ensures that any shrinkage happens before you sew.
- Rushing through the project: Take your time. Speed can lead to crooked seams or uneven handles.
Conclusion
And there you have it—a beautifully handcrafted tote with a flat bottom that’s as unique as you are! Remember, the beauty of this project lies in the personal touches and the learning that comes with each step.
FAQs
- How do I choose the best fabric for my tote bag? Look for medium to heavyweight fabrics such as canvas, denim, or thick cotton for durability and ease of sewing.
- Can I add additional compartments for organization? Absolutely. Plan additional pockets or dividers and sew them onto the lining before assembling the bag.
Resources and Further Reading
For additional inspiration and guidance, consider checking out some sewing books, websites, and video tutorials specifically geared toward bag-making. You might start with resources like Craftsy or attend a local sewing workshop.
Remember, every bag creation becomes part of your sewing story. Share your creation online to inspire others, and don’t forget to enjoy every step of the creative process. Happy sewing!


